

updated Monday 1st July 2002
 |
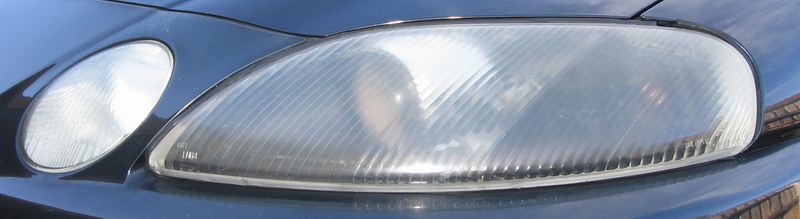
When I got my car from Japan the headlights looked great, it was a 1991 model with 77 000 km. I've seen so many Soarers with terrible cloudy moisture filled lights - it would drive me crazy. My car still lives inside and the headlights are still ok - but many are not so lucky |
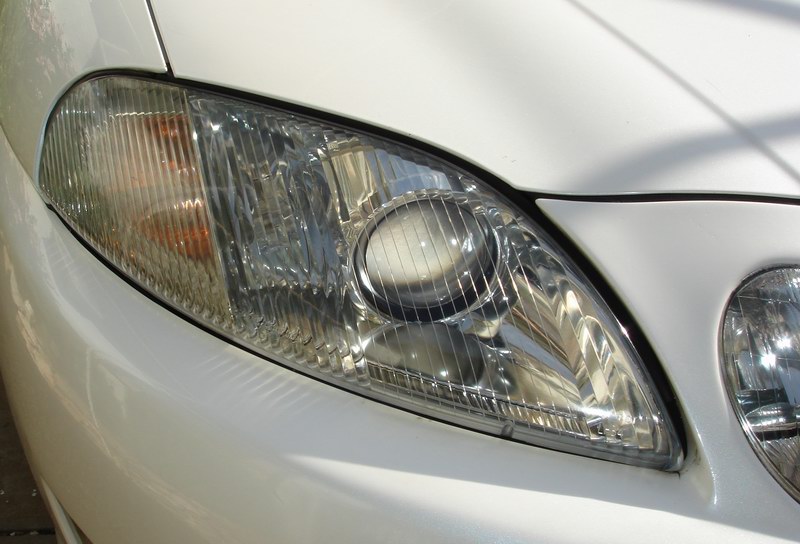
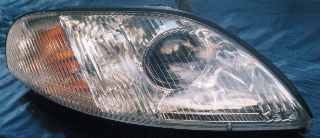
This light was brought back to life with a vigorous polish with Meguirs Sratch X - black tube costs around $18. It will turn yellow lights to this. Well worth trying first of all.

Before and after Scratch X polish shots by N J Herbertson
I was in an instrument repair shop and spied some globes and I thought I might as well replace mine since they were getting on. Standard bulbs are 55W, these ones are 60W - high wattage gets too hot and will damage lamps.
Philips 12 v 60W 9005 PR DOT HB3 P20d - $11 each
was what I got - four of them - I tried all the ones they had and this was all that fitted. High beams fitted great, low beams had to be trimed with some pliers.
Don't worry about those numbers - they aren't part numbers - just reference numbers from the parts cd.
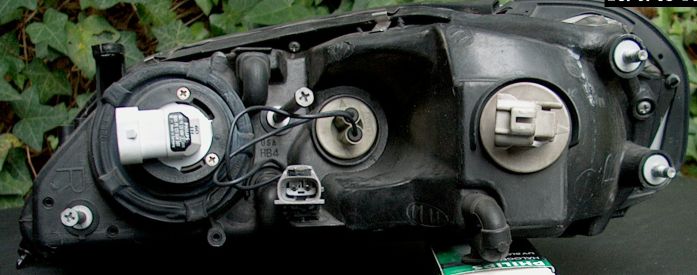
Sitting in the car this is the righthand lamp. Left to right is the main beam, parking light and indicator. You have to twist the bulb holders anti-clockwise to release them.
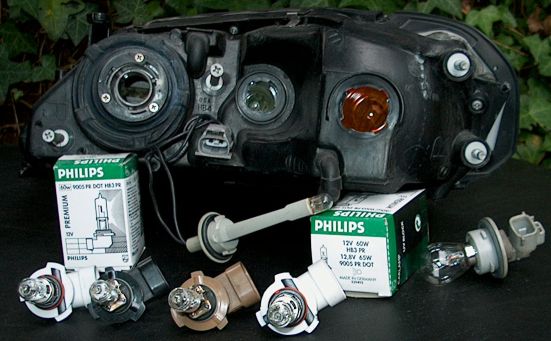
White bulbs are the new Philips ones, black is the high beam, brown the low beam and the long skinny holder is for the parking globe, on the right is the indicator bulb.
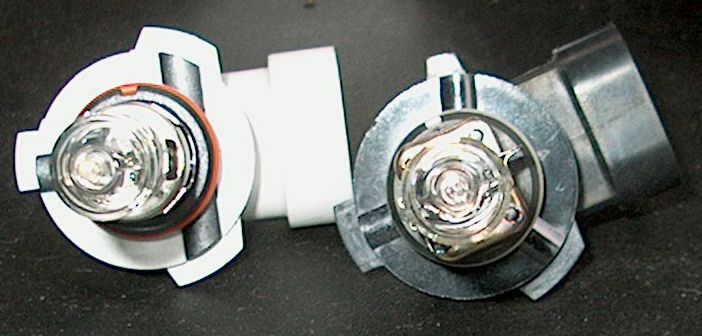
The third tang up the top looks too big doesn't it? - but it fitted straight in the high beam no worries. Philips on the left, standard Japanese Koito on the right.
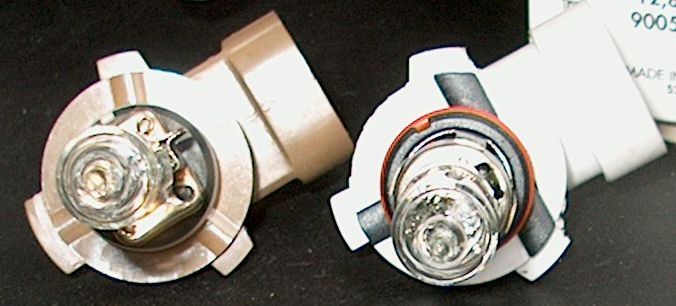
The brown one on the left is the standard main or low beam bulb. See how I expertly trimed the tangs on the white Philips bulb in the shop carpark with a pair of pliers? - looks factory........:) The electrical plugs on both bulbs went in no sweat - didn't have to worry about the grooves inside - no problems with these bulbs.
So they were real cheap - $44 for four of them - real easy to fit - took only a few minutes.
This is the back of the highbeam lamp - straight fit.
I guess the new bulbs were a bit brighter - but mine were ok before - these aren't HID's or anything - just standard type replacements that don't cost much.
A good read about HID's and the new Xenon type globes I recommend the following link:
http://www.intellexual.net/hid.htm
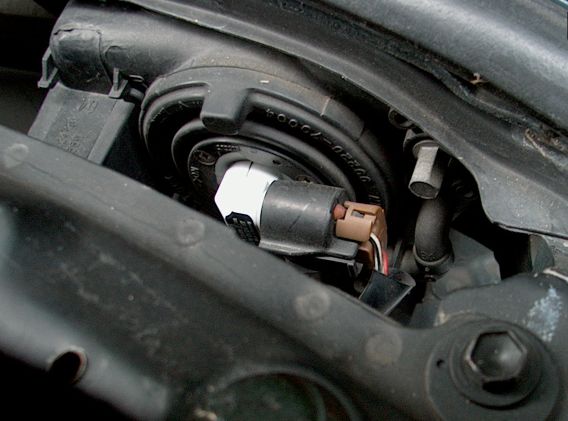
To remove the parking globe I would have to say take the battery and the airbox out first - you'll go crazy trying to get your fingers in there to twist it out - while the airbox and battery is simple and straight forward. The bulb is a simple push in type (10w?) - here is a close up:
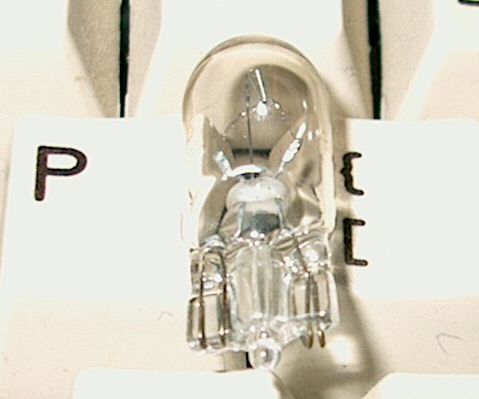
It's pretty small - here it is on my keyboard.
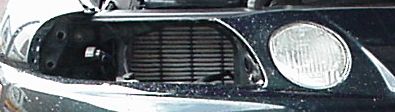
I you want to remove you headlights you need to remove the two 10mm nuts from inside the wheel arch. You can see them here on the left - you can't see them from inside the wheel arch until you pull back the plastic wheel lining - I reckon it's faster to take the wheel off so you can see what you are doing - some leave the wheel on - at least the car won't fall on your head that way - Don't jack it up unless you have proper axle stands or something - you never know.
I would have to say that removing your headlights, sticking them in the oven, then trying to pop off the plastic cover sounds pretty nasty - here is what other people experience while trying it:
The people that have tried the oven and the heat gun method reckon the
oven is a bit faster. Poor Rand though cremated his (but they had been mucked around with
prior to him getting them). Here is the link with pictures of how to clean them.
Headlamp
cleaning
First off is the whole polycarbonate vs.
Plexiglas debate. The lenses are actually polycarbonate and the McGuire’s products
are better suited for them. I used #17 cleaner followed by #10 polish
as per the instructions after buffing with plastic rouge on my buffer to get the rock
scratches out, and learned that Windex was the worst thing I could use for cleaning. I
also noticed dirt in the original silicone seal and determined this is where the leaks
came from. Since mine were so bad and had
water in them I noticed (not until the second one) that water becomes trapped in between
the chrome and plastic and needs to be dried thoroughly, BEFORE ASSEMBLY. A good tip you
may want to pass on is to plug one vent hole, install all lights and blow into the other
vent hole, or apply a small amount of air pressure, and spray
some soapy water on all sealed areas, o-rings and gaskets to detect any leaks before
re-installing. This step will save reaping the whole process. I also found that applying a
small amount of white grease or dielectric grease on all of the light socket o-rings and
gaskets helped with sealing.
Steve
Huff
The link is from the Supra Mark IV website. Here is an extract:
Oven Temperature: about 175-200F for about 5-10 mins, depending on the actual
temperature of the oven. Leave the headlights in there until they are somewhat warm to the
touch. Start at one end of the headlight, and use a dull object such as a butter knife of
dull screwdriver to separate the headlights.
The hair dryer/heat gun/oven method all have pros and cons. My 4 lights looked like new so
no mucking around for me. On the Club Lexus Forum in U.S. the SC moderator has just gone
through the process himself. He tried the hairdryer on one light and the oven on the other
light.
Here is an extract:
Advice given (by reLEXin247) was this:
I think you're missing the one nut inside the fender well. If you pull back the inner
plastic fender cover you can reach inside the fender and pull out a single 10mm nut (I'm
pretty sure that's the right size) and the headlight will come right out... Just make sure
you pull out the headlight slowly, it's easy to scratch the top of the front bumper area
with the headlight. When you actually get the light out, it is possible to pull the whole
front lens off the light assembly, but you will need a heat gun and lots of time. I
suggest heating the edge of the housing on the low setting on a heatgun and gently pull
the housing apart. I've done it before and trust me it's not any fun. Well good luck
I used standard clear silicone to reseal the lights and haven't had any problems with
moisture... Also while i was inside the light I polished the inside of the lens with plexi
polish. it made the lights look brand new. It took me about 3 hours per light to take out,
take apart, polish, reseal, and reinstall.
The moderator tried it (The Ikon) and said:
That was a long and tedious job... Easy but tedious!!! This is for all of you other SC
owners that are attempting this feat., either to prevent moisture(just reseal all around
the housing with silicone..DO NOT DISASSEMBLE, fix the same problem I had, or to achieve
those like new crystal clear lenses...
Take your time and make sure to seal THE ENTIRE area of the housing to prevent moisture.
USE GLOVES.. I also polished the lens inside and out(MAKE SURE ALL OF THE POLISH IS OFF
AND ANY SMEARS, OR FINGER PRINTS ARE OFF!!!). For those without any problems polish your
lens front/rear once a month anyway... I've been using the plexi glass/ plastic polish
every since I owned my 300ZX. Also use a good glass cleaner on the "chrome"
plastic housing with a soft lint free cloth.. REMEMBER whatever you leave on the surface
of in the unit will show up and you do not want to repeat this procedure for a simple
mistake...
When resealing the lens/housing make sure the seal is in the grove is tight and snug, to
prevent improper alignment of the headlight ass. once re-installed.
The drivers headlight looks 50% nicer than the passenger side; therefore, I must undertake
the journey again as I watch a movie with the wife...
This method saved me $400 per side and the few hours spent was worth it. The light looks
as good as new again...
MOST IMPORTANTLY DON'T USE HI-WATTAGE BULBS, ESPECIALLY WITH THE LARGER BULB
HEAD!!!!!!!!!!
They then discussed the oven method on the Supra site and the possibility of doing a
"Rand" (puddle of light at bottom of oven! - sorry Rand!)
"The Ikon" went ahead anyway and this is what he said:
I finally did the other side and I used the method on the www.MKIV.com web site, using the
oven... It works PERFECTLY, and cut the time down by 1 1/2 hours...
I put the entire light in the oven(electric) set at 175 degrees for 8 minutes,,, removed
and quickly started the prying away the light from the housing using a butter knife. (I
started at the bottom) I just followed Relexin's first direction and bling!!!!! Another
tight light!!!
Peter Mikhael (Pete) on Thursday, October 18, 2001 - 05:37 am:
I can fill the conversation up with my woes!! I have recently pulled out my problematic drivers side headlight (due to it being drenched with water) in an attempt to try to fix the "leak". I heated all the putty, removed the clear plastic cover from the black backing (that putty stuff they use is a bastard - I'm still finding balls of it everywhere..), I then dried and cleaned the inside thoroughly (polished the plastic) and finally used Silicon "Selleys All Clear" to seal the entire unit properly. Next rainy day what do you think happened? Fooking condensation again - piles of it! I reckon I'm at the end of my tether - anyone have any idea where the water may be getting in? I've noticed some "air ports" at the back of the light cluster (it doesn't appear water gets back there though), would it be wise to seal all these ports next time? Anyone having the same issues?
Peter, I've had the same problem with mine for about a year now. After a 500 mile
drive to Scotland mostly in the rain, the lamp got so bad that the the housing was half
full of muddy water. Likewise, I took it out, flushed it with cleaning solution, and
completely sealed it with silicon. But it still flooded.
I have now worked out that the main cause of my flooding was jointly down to imperfect
seals at the back of the lamp, a breather tube missing from the lamp, and a single empty
screw hole in the wheel arch lining.
The empty lining hole was about 3/4cm diameter at the edge of the lining, where it should
have been fastened by a screw fixing to another section. The other section had a similar
sized hole, which naturally lined up with the hole in the first section, directly inline
between the lamp and the upper edge of the tyre, with the result that the lamp got sprayed
by a concentrated jet of water every time the tyre hit a puddle.
With the breather tube missing, the lamp filled up in no time. With the breather tube
repaired, the lamp still filled up, but not as quickly. With the wheel arch lining screw
replaced, the lamp hardly ever gets damp, though it still does occasionally, drying out
again over a month or so.
I reckon that now, even with the wheel arch linings sound, water still occasionally sprays
onto the back of the lamp, maybe when deep puddles are hit fast, and this penetrates the
seal around the projector lamp tube, especially since the seal is old. It's interesting to
note that most Soarer lamp failures you read about are on the side closest to the kerb,
where the puddles lurk.
I'm now resigned to buying a new lamp cluster sometime to totally finish off the problem,
because the chrome in mine has become a bit tarnished with all the soakings.
If your chrome is still OK, it might be worth enquiring about new seals.
I'd check your wheel arch linings too.
Good luck!
PS There should be 2 breather tubes on each lamp housing, one on each "air port". If you have any tubes missing, don't seal any of them up! The lamp can still flood through the seals, but will never dry out - I've tried it. Getting the silicon back out of the ports was a bugger too.
Well if you are about to do your lamps I wish you luck! And if you have any nice pictures of your lamps apart - or stories, pass them on.